Help! I don't know how to eat anymore!

Help! I don't know how to eat anymore!

Saturday, January 29, 2011

Roasted Red Pepper Soup


Let's start by stating that I have never purchased this many bell peppers at once. I actually don't think I've purchased this many of anything at the grocery store ever. Whenever I make a soup, I usually double or triple the recipe so I can freeze a ton and have lots of warm and quick options throughout the cold winter. I go into hibernation mode during the darkest part of winter and would often rather be cuddling on the couch under a blanket than cooking for 2 hours.


Broiling peppers is something I have yet to master. As soon as I see the char start to appear I begin panicing and usually pull the peppers out of the oven. Isn't burning bad? I stress out and stare through the oven window and bite my nails until it's all over. If you haven't let the peppers char completely and you've bitten all your nails off, you get to endure a highly time consuming peel-a-thon. Trust me, the blacker the better. It will save you quite a bit of time in the end.


A few weeks ago I went to dinner at a friend's house for her birthday. Her husband is a great chef and cooked us a fabulous multi-course meal, pairing each course with delicious wine. Our soup course was one of the best I've ever had, a roasted red pepper soup with fresh crab. I raved about it with a big goblet of wine in my hand and decided then that I was going to make it on my own.


I was offered the recipe but politely declined and wanted to go at it on my own. How hard could it be? I looked up a couple recipes and it seemed fairly straightforward. My bigest obstacle was how to thicken the soup without using wheat. All the recipes I found used bread as a thickener which doesn't really fit in with my philosophies these days. 


I settled on a recipe that called for a russet potato rather than bread and boom goes the dynamite, I was off to the store. My second problem was I've never cooked crab. I found a recipe that looked delicious but wanted me to buy a whole crab, remove and cook all the meat, and soak the shell in the soup. Ummm...


I made a quick call to my chef buddy in the parking lot of the grocery store and asked what was up with the crab. He said he bought fresh pre-shelled and pre-cooked crab at our local grocery store for $12. Now, problems three and four. Working only part time means my funds are limited, so $12 for 6 oz of crab meat was not really in the budget (not to mention these recipes are typed up and photographed for an audience that consists mostly of me, so my profit margin is nonexistent). 


Problem four was even if I'd had $12 extra for some crab meat that I could probably cook myself for much cheaper (future post!), it didn't matter because I was at a chain grocery store and they only had frozen crabmeat that looked somewhat horrendous and was more expensive. So, for this time around, I forgot the crab and just made a delicious soup.


Halfway through cooking I thought to myself, 'It probably would have been a good idea to make this once, taste it, and THEN make extra batches to freeze once I knew it was good.' Hindsight is 20/20, friends. Luckily enough for me, this was yummy and my freezer is full of lunch and dinner sized portions I have been taking with me to work very often.


One more comment about peeling the peppers. I wasn't able to get all the skins off before using the handy vintage immersion blender I bought my sister for Christmas (another thrift store find for $3!) to puree everything. This resulted in some slivers of skin in the end product that are a slightly odd texture in your mouth. Next time I will absolutely let everything char char char, and maybe I'll save up and splurge on some crab.


Roasted Red Pepper Soup, adapted from allrecipes.com
  • 6 red bell peppers, seeded and cut into quarters
  • 32 ounces (1 carton) low-sodium organic chicken broth
  • 1 large russet potato, peeled and chopped
  • 1 quart fat-free half-and-half 
  • 1 tsp salt
  • 1/4 tsp cayenne pepper, to taste
  • 1/2 tap garlic powder
  • 1/2 tsp dried basil

  • OPTIONAL, but highly suggested:
  • 1 pound cooked crabmeat, flaked


Set the oven to broil and preheat for about 5 minutes. If your oven offeres a high or low broil, choose low. Cut the peppers into quarters and deseed, placing quarters skin-side up on a baking sheet. Allow peppers to broil until skins are black and charred, the blacker the better as I said before because it makes for easier peeling. 
Remove peppers from oven and place in a paper bag to sweat for about 10 minutes, loosening the skins. Peel skins and discard, then chop peppers and toss into a large pot with chicken broth and potato. Boil over high heat, then add half-and-half, salt, cayenne, garlic powder, and basil. Reduce to medium heat and simmer for about 45 minutes. 
Make sure potato has softened, then puree soup in a blender, food processor, or using an immersion blender until completely smooth (if you were unable to remove some of the peel, you will end up with some slivers like I mentioned before and these will never get smooth so don't worry about those...you can try straining them out or just swallow them).

OPTION:
If you decided to add crab, you have two options. You can pour the pureed soup back into the pot, add the crab, and heat for about 5 minutes over medium heat to warm the crab. You can also do what my chef friend did and portion the soup out into bowls and drop a little handful of crab into the middle. The soup is so warm it will heat the crab on it's own and it allows people to portion how much they want in each bite.


Bon appetit...just not wheat!

Thursday, January 27, 2011

New In The Kitchen!

Thanks to some very diligent thrift storing the last week, I have obtained several items off my WhoWhatWheat is coveting Amazon Wishlist. Check out my fabulous and cost-effective snags below!

Cuisipro Stainless-Steel Spray Pump Non-Aerosol Mister from William Sonoma, complete with receipt and original stickers/directions/recipes. Amazon.com has it listed for Amazon has it listed new for $13.83, I paid $2.25 at the Santa Cruz Goodwill. 

While Grocery Outlet technically isn't a thrift store, they DO provide deep discounts on kitchenwares among other things, so I'm counting it. A few months ago when I attempted my first roasted chicken, I had a roasting pan but no rack. Being the resourceful gal that I am, I took a wire cooling rack usually used for cookies and bent and jammed it in until it fit. This rack is slightly less ghetto, not to mention adjustable, so I can roast poultry to my heart's content. Originally $5.99 elsewhere, I grabbed this for $2.49.

I've been searching high and low for one of these ever since I attempted to make Yukon Gold Blinis out of the French Laundry cookbook last year. Sometimes a girl just needs super smooth potatoes your food processor can't produce. They're always using these on Hell's Kitchen and it took me a while to figure out what the hell they were but ever since I've been hunting. A few weeks ago I found the Cuisipro Stainless Steel Food Mill from my Wishlist at the local Salvation Army, but it was missing the grate plate for the bottom and it wiggled a bit too much for my liking. I thought for $3 it was worth purchasing and searching online for replacement parts, but then second guessed myself and put it down. Last week I saw one that looked like it was from the 50's but it had some rust on it and they wanted $10. On Tuesday I finally found this gem brand new in the box still wrapped in plastic and with all the pieces. Amazon used to have it for almost $100, I paid a tidy $15 at the local Hospice thrift store.

I've always wanted one of these, not because I think they're in any way practical. Can you imagine trying to whip egg whites or whipped cream with this? Tedious. However, I absolutely love the way they look and this one perfectly matches the green walls of my kitchen so I will be hanging it up as art to remind me how much I love my handmixer. 

I'm horrible at slicing apples. I have a fancy contraption you attach to the counter and stick a whole apple in and then spin it to peel and core and slice into rings, but it's not practical and if I'm being honest I NEVER use it. This 50 cent gem is old and worn, but will slice and core my apples in seconds. Thanks Cancer Aid thrift!

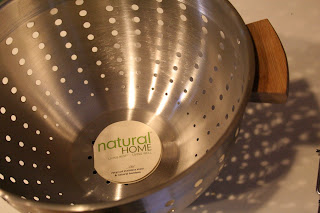
This is another Grocery Outlet find, a recycled stainless steel colander with bamboo handles. My sister and I have two strainers, neither of which is an actual colander. We have one mesh one with a handle and a giant rip in the mesh and a plastic one with a handle. Neither of these is convenient when you have a hot pot in your hands and you need a third hand to hold a strainer because it won't sit in the sink without tipping over. After a few years of being annoyed by this dilema, I picked up this beauty, originally $19.99, for $6.99. I welcome myself to hands-free straining.


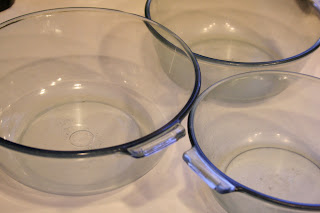
Ahhhh, the pièce de résistance. Before you is a 1935 Hamilton Beach mixer with 6 attachments and two Pyrex glass mixing bowls. The top can be detached and used as a hand mixer which might be the cutest thing I've ever seen. While it needs a litte cleanup, everything works beautifully. This comes with impeccable timing as my KitchenAid has taken a nosedive and decided to cease aiding me. It makes a fairly heinous noise and refuses to spin any attachment I suggest. I procured this from Hospice thrift store for a whopping $6. The smaller bowl goes for about $15 on eBay just by itself, so I feel like I scored pretty big. 

Keep your eyes peeled for new posts in the works: Roasted Red Pepper Soup, Winter Whiskey Drinks, and Baked Meatballs.

Bon appetit...just not wheat!

Wednesday, January 26, 2011

Wednesday Night Dinner Mousse

Disclaimer: Despite what you may think, I do realize that the photo below is probably not the best opening picture as it looks a bit...disgusting. I completely forgot to take pictures before I served it all so I promise the next time I make it I will take fancy ramekin photos and place them here. 


I'm not one for memorizing recipes. No matter how many times I've made something, I usually still need a recipe to get it right. This makes me know I will never be a real chef as I have little ability to freestyle my way through cooking.
 A few winters ago in the midst of the winter blues my friends and I started a weekly tradition called Wednesday night dinner. It was something to look forward to, a reason to continue on with your week when it got dark at 4:30 every day and was 30-40 degrees for months. There were three of use who lived at the ends of 3 streets that were parallel to each other, so we had an excuse to go for a short drive and hang out for dinner. These weekly dinners also gave us a chance to branch out and learn new types of foods with a different theme every week. As the days get warmer, the dinners begin to peter off and eventually cease altogether.
Every fall the days begin to shorten again and eventually we all make a triumphant return Wednesday Night Dinners. Tonight is our first of the 2010/2011 winter and the theme is comfort foods. I have some very talented foodie friends, making it hard for me to always stay on the wheat-free train. For me, comfort foods are usually starchy or sweet so in the hope of getting a post out of it I went the sweet route this time.
For all the times I've made this chocolate mousse with a recipe, I would think I could make it again with a recipe. Excited to wow people with my comfort food dessert tonight, I made sure to follow everything to the letter.  I read and reread everything and double checked myself often. It's a fairly simple recipe, only 6 ingredients, yet when covering the mousse with parchment paper to put in the fridge to chill I noticed a stick of butter sitting on the counter.

Sigh.
I reread the recipe again and figured out where I went wrong. These freakish sunny 60 degree January days are throwing me off. I added the butter at the end and hoped for the best. Luckily for me, this turned out to be a happy accident just like that Sun-Dried Tomato Pesto last summer.
Because I left the butter melting out of the chocolate melting step, the chocolate just sort of balled up when I added the brandy and egg. On the up side, these chocolate balls turned out to be little chocolate pearls inside a quite delicious chocolate mousse. I'm a huge fan of added chocolate chunks or chips to baked goods, specifically brownies, and I think these little balls added a nice contrast of texture for my mouth.
So, a successful mousse even though I mistakenly improvised my way through it. I lovingly borrowed this recipe from smitten kitchen and she gets all the credit. The only thing I have ever done differently is adding dons of fresh raspberries on top to cut through so much heavy chocolate. Raspberries and chocolate is one of my favorite combinations and in this case it's heavenly. Enjoy.
Chocolate Mousse

8 ounces bittersweet chocolate (no more than 60% cacao), chopped
3/4 stick unsalted butter, cut into pieces
3 large eggs, separated
1 tablespoon brandy
1 cup whipping cream
1/8 teaspoon salt
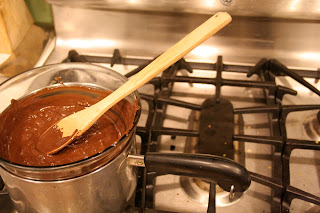
Place a heatproof bowl over a saucepan of simmering water and melt the chocolate and butter in the bowl, stirring until smooth. Remove from heat. You can melt the chocolate in the microwave, but microwaves sort of scare the bejesus out of me so I avoid them whenever possible. Also, it's pretty fun to create a ghetto double boiler and feel fancy. This isn't the first time either, I felt uber fancy when I did a double boiler for the Chocolate, Raspberry, and Banana Dessert Pizza last November.
Using an electric mixer, beat the yolks in a bowl for two to four minutes, just until thick enough to form a ribbon that takes a few seconds to dissolve. Add yolks and brandy to chocolate and butter mixture, then cool to warm. In another bowl, beat the whipped cream just until it holds stiff peaks. In yet another bowl, add salt to egg whites and beat until they hold soft peaks. While this recipe is easy and has very few ingredients, it is does use quite a few kitchen utensils so get ready to do some dishes...or serve people some mousse and make them clean up for you!
Anyway, gently fold the whipped cream and beaten egg whites into the chocolate and butter mixture. Voila! Mousse! You can serve in ramekins or fancy bowls with whipped cream and raspberries on top or whatever variation you would like. Smitten kitchen says this recipe serves 8. I'm not the best at portion control and this was definitely comfort food week for Wednesday Night Dinner, so I say it probably more comfortably serves 6. You can cover with parchment paper and keep in the fridge for up to two days, just make sure to take the mousse out 30 minutes before serving. But trust me, it won't last two days once you taste it.
Bon appetit...just not wheat!

Tuesday, November 23, 2010

Chocolate, Raspberry, and Banana Dessert Pizza


Ever since the time change, my urge to hole up in my freshly-painted kitchen with fresh ingredients has grown strong. My urge to devour desserts, however, has been around a lot longer. This past weekend my friends and I held our fifth annual Fakesgiving, a Thanksgiving for friends where everyone brings a dish they're good at making and some booze and we revel in each others' company.


The tradition started one year after my mother was killed. I was living in San Francisco with one of my good friends and I was having a hard time dealing with the one year anniversary of my mom's death. My friend contacted another good friend at home and they arranged to have a bunch of my friends show up in SF for our own Thanksgiving so I would know how loved I was. 


We have managed to keep the tradition alive and well, topping ourselves every year (prom dresss, raw turkey, boys and girls switching clothes, and so on). Fakesgiving does not require Thanksgiving foods, just people bringing whatever they are good at making and booze and everyone enjoying each other's company. We basically celebrate how much we all like each other in a party fashion. 


The fifth annual Fakesgiving was held this past Saturday and it was absolutely magical. Our small town received a very large beating early Saturday evening from Alaska and we got almost a foot of snow. We lost power a few hours later until 6am the next day, so we spent a fun evening playing outside (the boys threw snowballs at each other from off the roof) with both fireplaces blazing inside the house and games and coodling by candlelight.


There is still snow on the ground outside and it's been getting dark extremely early and it's cold. Naturally, this puts me in the mood for comfort food and what's more comforting than dessert? This recipe was inspired by two things: the Hot Italian Zucchero Pizza and the confused checkout guy at my local health food store.


When I was buying my second package of gluten-free pizza crust mix after my first two epic failures, I also grabbed a bar of Chocolove Rasberries in Dark Chocolate (my favorite chocolate to carry around for sweettooth emergencies). The checkout guy asked me if I was going to put the chocolate into the dough and I looked at him confused. I told him the purchases were for separate purposes, though I flashed on that out-of-control-delicious dessert pizza I'd had at Hot Italian and began to formulate an idea.


I knew I would have leftover dough after making the Arugula and WhiteFresh Mozzarella with Arugula and White Truffle Oil Pizza so I decided to make a dessert pizza using the raspberry chocolate. The result was so delicious that my sister asked me to make three more so she could eat them for every meal. 


Chocolate, Raspberry, and Banana Dessert Pizza
1/2 package Bob's Red Mill Pizza Crust mix (to make one pizza, use the whole package to make 2)
1/2 cup powdered sugar
3 bars Chocolove Raspberries in Dark Chocolate
1 package fresh raspberries
2 bananas
a little extra powdered sugar


Make the pizza dough according to directions on the package. When dough is finished kneed in 1/2 cup powdered sugar. Sprinkle some powdered sugar on a pizza stone or pizza sheet so the dough doesn't stick and roll or kneed into whatever shape you want (I chose a heart because I heart dessert). Sprinkle with powdered sugar and bake the dough for about 20 minutes or until golden brown. While the dough is baking, melt chocolate on the stove in a double boiler. You can create a makeshift double boiler by placing a glass bowl on top of a pan of boiling water that is larger than the pan. Once the dough is done slather on chocolate and add fresh raspberries and sliced bananas. Drizzle any remaining chocolate over the top of the fruit and dust with powdered sugar. 


Bon appetit...just not wheat!

Monday, November 15, 2010

Learning Patience for Pizza


I suppose all good chefs have bad days and dishes that flop. People who are mediocre chefs, like myself, have a lot of these. Does this look like pizza dough to you?


Hint: it is not. This is watery failure number 2.

I bought an all-purpose gluten-free flour mix that claimed it could be used to make pizza dough. It claimed you could substitute it cup for cup for regular flour. It made lots of claims. What I did not see because my sister threw away the bag before I could read it was that it claimed you would need some xanthan gum for said substitutions. Luckily for me I did not figure this out until I'd made two attempts on two different days and used up all my expensive flour and driven to the store to buy more and then read the package to see what I had missed. Then I saw that xanthan gum was $10 a package and I just broke down and bought a gluten-free pizza crust mix.


This was so much easier. I ditched the bread machine and made it by Kitchenaid and everything went according to plan. All I had to add to the mix was eggs and oil and water. Simple. Bob's Red Mill mixes and flours and grains come in several varieties and I've been able to find them at both my local health food store and our bigger grocery stores. I've also heard great reviews of Pamela's Products which I will have to test out soon.


Fun fact: the eggs I used to make this pizza crust were from my own home-grown free-range happily quacking ducks.

A few weeks ago I was perusing the deals at Grocery Outlet and found a small bottle of white truffle oil for $2. I've never tasted or used truffle oil but people are always raving about it, specifically on food TV, so I thought it would be a fun challenge. I snatched up a bottle and began devising a plan.


There is a fantastic restaurant in Midtown Sacramento just blocks from my best friend's apartment called Hot Italian that I have cheated with wheat in on several occasions. They serve up pizzas piled high with lots of fresh greens and I've been meaning to attempt a recreation at home that wouldn't offend my intolerant tummy. I settled on a fresh mozzarella with arugula and truffle oil pizza. I smothered the finished product with parmesan and red pepper flakes and poured a nice glass of red wine and was a very happy girl.


Fresh Mozzarella with Arugula and White Truffle Oil Pizza
1 package gluten-free pizza crust, prepared according to directions (Pamela'sBob's Red Mill, etc...the Bob's mix made two crusts but I was only eating for one so I saved the other ball of dough in the fridge)
1/3 can organic pizza sauce
fresh mozzarella, sliced (I used about 8 thick slices, vary it depending on your love of cheese)
1/2 bunch arugula

white truffle oil


I slathered a thick layer of pizza sauce on the crust and strategically placed the mozzarella so that when it melted it would cover everything. I put the pizza in for about 16 minutes, then turned on the broiler for 3 minutes so the cheese would get all nice and crispy brown.


While the pizza was cooking, I washed the arugula and broke off some of the longer stems (aside from broccoli, I hate the stems of greens). I threw the arugula in a bowl and drizzled truffle oil all over it, tossing the greens around so they were all coated. When the pizza came out I threw the arugula on top and devoured almost the entire thing. So yummy and it reminded me of the trip to Italy I took in January.


I have big plans for the remaining ball of dough in my fridge to become a delicious dessert pizza. My dream is to involve a raspberry chocolate thanks to a misunderstanding with the health food checkout counter guy. Stay tuned!


Bon appetit...just not wheat!